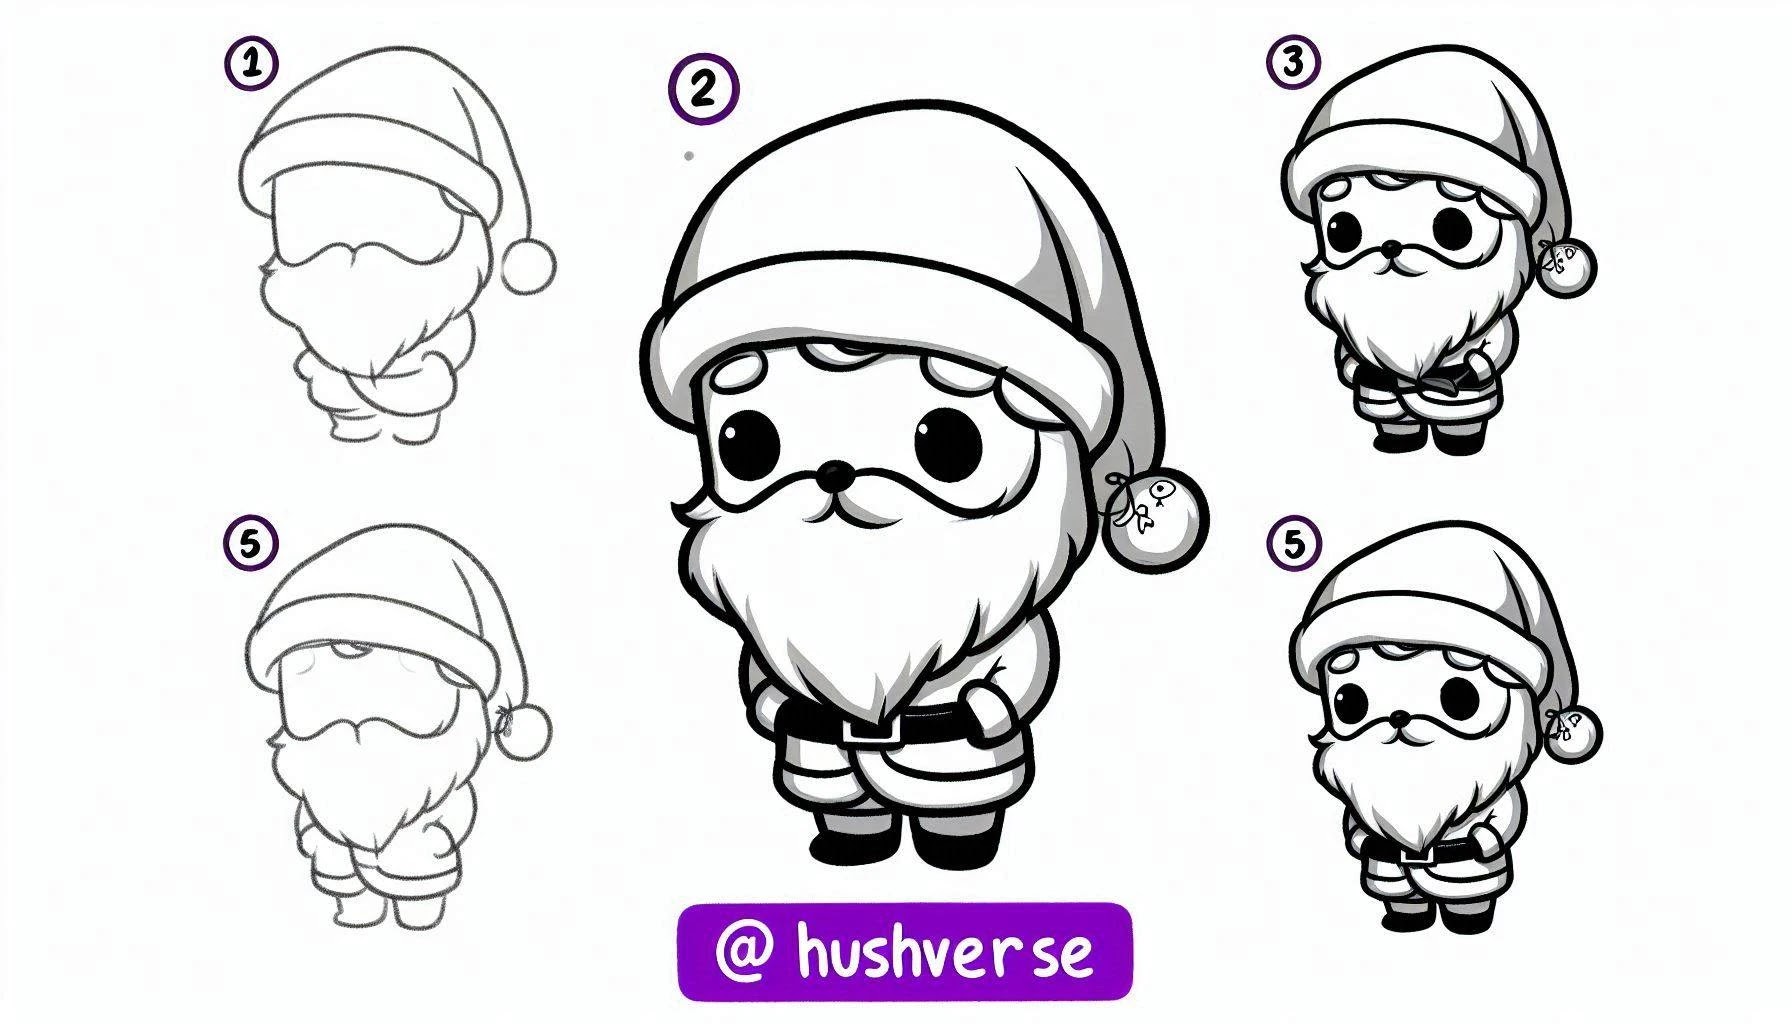
Are you ready to dive into the festive spirit and add a touch of holiday magic to your art? If you’re new to drawing or just looking to create something merry and bright, this step-by-step guide on how to draw Santa Claus will help you capture the jolly essence of St. Nick. No need to worry if you’re not a seasoned artist—this guide is designed to be fun and easy, with clear instructions that anyone can follow.
So, grab your favorite drawing tools, find a cozy spot, and let’s bring Santa to life on your canvas!
ℹ️ Photo Download Instructions:
📱 On mobile: Long press the image to access the download option.
🖥️ On computer: Right-click the image and select "Save Image."
🎨 What You’ll Need
Before we begin, let’s make sure you have everything you need:
- Paper: Any kind of drawing paper will do.
- Pencil: For sketching the initial outlines.
- Eraser: To clean up any mistakes.
- Black Pen or Marker: For outlining the final drawing.
- Colored Pencils or Markers: In red, white, beige, brown, and black.
Now that we’re all set, let’s get started with the step-by-step tutorial!
🖍️ Step 1: Start with Santa’s Beard
To begin, we’ll draw the most iconic part of Santa—his fluffy, snow-white beard. Start by sketching a large, slightly elongated circle in the middle of your paper. This will serve as the base for Santa’s beard, giving him that warm and welcoming look we all know and love. Don’t worry about getting the shape perfect; a little bit of irregularity will add charm to your drawing.
🖍️ Step 2: Draw the Nose and Mustache
Inside the beard, draw a small oval shape right in the center—this will be Santa’s nose. Below the nose, sketch a long ‘U’ shape that curves gently at both ends. This is his mustache, which should sit comfortably within the beard. Think of the mustache as two soft, fluffy clouds hovering just below his nose.
🖍️ Step 3: Outline Santa’s Face and Add His Eyes
Next, it’s time to outline Santa’s face. Draw two curved lines on either side of the beard, creating a gentle frame for his face. Then, add two small circles in the center for his eyes. Make sure they’re wide and bright, giving Santa that twinkling, joyful expression that’s full of holiday spirit. Finally, draw two small semicircles on each side of the head to create his ears, making sure they peek out just enough to add a bit of character.
🖍️ Step 4: Create Santa’s Hat
No Santa Claus is complete without his signature hat! Start by drawing a thick band just above his eyes—this will be the brim of the hat. Next, sketch a floppy triangle shape extending upward and to one side, as if the hat is casually tilted. Don’t forget to add a small circle at the tip of the hat for the fluffy pompom. This hat should look cozy and slightly oversized, just like Santa himself.
🖍️ Step 5: Draw Santa’s Body
Now that Santa’s face is complete, it’s time to move on to his body. Draw a bell-shaped outline directly below the head. This shape will form the base of Santa’s torso, giving him that round, jolly appearance. Make sure the body is proportionate to the head—Santa should look plump and cheerful, ready to spread holiday cheer.
🖍️ Step 6: Add the Belt
Santa’s outfit wouldn’t be complete without his trusty belt. Draw a wide band around the middle of the bell-shaped body. Then, add a rectangular buckle in the center of the belt. This step adds a nice touch of detail to your drawing, emphasizing Santa’s classic red suit.
🖍️ Step 7: Sketch Santa’s Arms
Next, let’s give Santa some arms to go along with his cheerful wave. Draw two slightly curved U-shapes on each side of the body, starting from just below the belt. These will be Santa’s arms, ready to hold his sack of toys or wave to children as he prepares for his Christmas Eve journey.
🖍️ Step 8: Draw Santa’s Boots
At the bottom of Santa’s body, sketch two simple boot shapes. These should be rounded and slightly oversized, giving Santa the sturdy footing he needs to travel the world in one night. The boots should be facing outward, adding to the playful, cartoony style of your drawing.
🖍️ Step 9: Refine Your Drawing
If you’ve been using a pencil so far, now is the time to go over your drawing with a black pen or marker. Carefully trace over the lines you want to keep, and use your eraser to remove any unnecessary pencil marks. This step will help your Santa Claus drawing look clean and polished, ready for the finishing touches.
🖍️ Step 10: Add Some Color!
Finally, it’s time to bring your Santa Claus to life with color. Use red for his suit, hat, and boots, white for the beard, hat brim, and pompom, beige for his face, and brown for his belt. Feel free to add your own creative touches, like rosy cheeks or a twinkle in his eye, to make your Santa Claus truly unique.
We hope you’ve enjoyed this fun and festive tutorial on how to draw Santa Claus. Remember, the magic of creating art lies not just in the final product but in the joy of the creative process. If you’re decorating holiday cards, crafting personalized gifts, or simply enjoying a relaxing art session, your cute Santa Claus drawing is sure to bring smiles to those who see it.
Keep practicing, keep experimenting, and most importantly, keep having fun. Wishing you a holiday season filled with creativity, warmth, and joy. Happy drawing, and Merry Christmas!
